Sunday, October 14, 2012
Life Changing Green Juice
I attended the Ladies' Homesteading Gathering Retreat this weekend and learned a lot about living well. The Ladies' Homesteading Gathering is a group of women interested in the homesteading (read: trying to be self-sufficient) lifestyle. It was a wonderful weekend of learning, fellowship and food! I don't know that I could pick a favorite class, but I definitely found my new favorite snack, courtesy of juicer extrodannaire, Valerie. She is a juicing advocate and an inspiration to all who aspire to consume more raw foods. My favorite juice was one she calls Morning Metabolism Boost. I modified it slightly to take advantage of things we had growing on the farm right now.
Valerie's Morning Metabolism Boost
2 cucumbers
2 stalks celery
2 apples
1 handful arugula
1/2 knob of ginger root
1 ounce apple cider vinegar (don't skip this! It really brings the juice together.)
1/4 tsp cinnamon
You could also add a beet in there. I tried that tonight and it was delish!

Wednesday, September 26, 2012
Homegrown for the Cure

Our very first event is THIS SUNDAY! It's for a great cause and one that is very near and dear to our hearts, and surely a lot of other folks as well. Parking will be available next door to the farm at 1041 Kenway Drive - there will be plenty of signage to let you know where to turn in. Tickets can be purchased online ahead of the event at www.homegrownforthecure.eventbrite.com or you can buy them at the door. Kids 12 and under get free admission and you can score them a kid's lunch plate for just $5. Come out and join us! The weather is supposed to be fantastic.
Sunday, September 9, 2012
The Carb Loving Farmer

Buttermilk Biscuits
2 cups bread flour (sometimes I replace one cup with whole wheat flour)
1 tablespoon suger
3 teaspoons baking powder
1 teaspoon salt (prefer course salt)
1/2 cup butter or shortening
1 cup buttermilk (or 3/4 cup plus one tablespoon whole milk)
Preheat your oven to 450 degrees. Mix dry ingredients in bowl with whisk until combined. Cut in butter or shortening using a biscuit cutter (preferred) or two knives. The mixture should look crumbly. Add buttermilk or milk using a rubber spatula (or your hands!) to distribute evenly. If dough is very wet, sprinkle with flour. Transfer dough ball to a flour surface and knead about 10 times. Over-kneading makes the biscuit tough and under-kneading makes for flat biscuits. 10 times seems to be the magic number for me. Knead by gently pressing ball out flat, folding in half and turning over to repeat. After kneading, press flat into an even circle about 1/2 inch thick. Then either use a biscuit cutter or just cut into evenly sized pieces and place on ungreased cooking sheet. Cook 12-14 minutes or until just brown on top.
Greek Yogurt Biscuits
I'm serious! Admittedly, these are NOT as delicious as buttermilk biscuits but if you eat biscuits as often as we do, it is necessary to slow down on the butter intake. The texture is a little different on these biscuits, but the flavor is great.
Simply replace the shortening or butter above with 1 cup of Greek Yogurt - I've used both full fat and low fat versions and haven't noticed a considerable difference, but keep in mind a lot of low fat versions use stabilizers to achieve the thick consistency. Decrease milk to 1/2 cup. Dough may be wetter. Follow instructions for kneading and baking.
The crust on these is usually a bit crispier and the inside a bit chewier than buttermilk biscuits.
Cornbread
Betty Crocker refers to this recipe as "Yankee Cornbread", which seems to relate to the addition of sugar. I personally think Yankee Cornbread is too sweet and Southern Cornbread is too plain. I make mine half-Yankee and half-Southern. We can just call it "Peace Treaty Cornbread". I strongly recommend cooking this in an 8"-9" round cast iron skillet.
1/4 cup melted butter
1 cup milk
1 egg
1 1/4 cup corn meal (You can buy locally from Red Mule)
1 cup all purpose flour
1/4 cup sugar
1 tablespoon baking powder
1/2 teaspoon salt
Preheat oven to 400 degrees. If using a cast iron skillet, melt butter on the stove and pour into mixing bowl. Then your cooking vessel is already greased! If using a regular 9" round pan, make sure to grease bottom and sides. Mix butter, milk and egg in a bowl with whisk. Mix dry ingredients in a separate bowl until combined and then combine all ingredients together using a rubber spatula. Pour into greased pan. Bake 22-25 minutes. Enjoy hot with butter and honey!
Sunday, August 26, 2012
Sweet, sour and distinctly southern

If you are one of the many folks that has yet to try a scuppernong, make sure to try one when you stop by the stand or market. Here are some tips on how to enjoy your very first scuppernong experience.
Get hands on: Scuppernongs (and muscadines) have quite thick skins. When you grab a 'nong, hold the whole thing in your mouth with your thumb and forefinger and bite down on the end until the fleshy insides "pop" out of the thick skin. The "pop" is what makes this fruit so fun to eat. You'll get a rush of sour sweet flavor.
Savor the flavor: Scuppernongs are like table grapes on steroids. They are thicker, heavier, sweeter and more sour. You'll want to chew slowly so you can sort out the seeds from the yummy flesh. It won't hurt you if you swallow them, but they do impart a bitter flavor if you accidentally take a bite.
Give back to Mother Nature: Like all the best fruits of summer, scuppernongs give back to the earth in the form of seeds and skins. We believe they are best enjoyed on a porch where you can just toss the skins and spit the seeds, but they are actually quite delightful anywhere, as long as you've got somewhere to stash the debris.
Hope you'll consider giving this native grape a try!
Monday, August 13, 2012
Introducing Asian long beans!

(Disclaimer: These are not Native Sun beans in the picture. I had to nab a picture of the internet of this beautiful legume because my camera was not cooperating.)
This is an Asian long bean. If you've been by the farmer's market or the farmstand lately, then you have already been introduced. Its flavor isn't too far afield from your standard green bean, but it's string-less and it's beautiful! I can't say that there is a right or wrong way to eat these beans, but I do have a few suggestions.Don't be afraid to eat them raw. As is usual in our household, we had our eyes opened to this practice by our son. He thinks they are delicious raw and even I was swayed. I prefer my raw beans cut up and placed atop a bed of arugula with a healthy dose of balsamic vinaigrette dressing, but to each their own.
Treat them like a southerner would. What can I say? I pretty much grew up in Georgia and I like a well-cooked bean. I know it's not gourmet, but it is the taste of home. Chop these bad boys into 1 inch sections and throw in a pot of boiling water with a little bit of bacon grease (or fatback!) and a healthy pinch of salt and cook until soft. Bean enthusiasts are shaking their heads in disgust, but those of us that are sopping up the bean juice with a hunk of cornbread are quite content.
When in doubt, roast! I have a strong aversion to any food that squeaks when I'm chewing it. This sometimes happens with green beans and I'm always on the look-out for how to avoid that unfortunate side effect. Roasting has done right by me in this regarding. A 450 degree oven, a roasting pan or cooking sheet lined with parchment paper and a generous dousing of olive oil and sea salt and maybe a seasonal herb. Keep an eye on them until their skin browns and crisps, about 10 minutes at our house. Pull them out and flip over with a spatula and roasts another 5 minutes or so. Finish with a squeeze of lemon juice and serve warm.
Sunday, June 10, 2012
Farmer Brent's Veggie Lasagna
We are very busy on the farm right now between the constant bean harvest and chasing down vicious squash vine borers, so the kind of meals we like are the kind that we can make on a lazy (rainy!) Sunday evening and enjoy for a few nights before we have to think too hard about cooking again. That's what's so great about a big ol' batch of lasagna. It taste just as good on Day 3 as it did on Day 1. We use zucchini slices instead of lasagna noodles. We've also heard that eggplant slices work really well as faux noodles.
Farmer Brent's Veggie Lasagna
2 large zucchini, sliced thinly longways
16 ounces cottage cheese (could also use ricotta)
1 cup parmesan cheese, grated
1/2 cup minced basil
1/2 cup sun dried tomatoes, diced
1 large egg
Salt and pepper
6 cups tomato sauce
1/2 onion, diced.
3-4 cups mozzerella (depending on your preferred thickness for the cheese topping)
Preheat oven to 375 degrees (I refer to this temperature as "casserole temperature" - it seems like every casserole recipe since the dawn of time suggests this temp.)
Prep your zucchini by slicing thinly. A grater or a mandolin is very helpful.


Heat a sauce pan over medium heat. Add a little olive oil and saute up the onions until translucent. Stir in tomatoes and let heat up over medium-low heat. Mix cottage cheese, parmesan, basil, egg, sun dried tomatoes, 2 cups of mozzerella and salt & pepper in bowl. Spread 1/4 of the heated tomato sauce in the bottom of a 9 x13 baking dish. Place a single layer of zucchini slices on top. Put 1/3 of the cottage cheese mixture down on top of zucchini and spread evenly.

Continue layering this way. For the final layer, put zucchini down and top with remaining sauce. Cover and bake for 15 minutes.


Pull from oven, remove foil and top with remaining mozzerella. Continue cooking for 20-25 minutes or until cheese in browned.

Enjoy with a delicious salad!
Sunday, June 3, 2012
Stuffed Zucchini with Barley, Sausage & Tomatoes
We've been growing these cool round zucchinis for the last couple of seasons and we really enjoy them. They are great for your typical zucchini applications - sauteing, grilling or steaming - but their shape makes them extra fun for stuffing and roasting.

Stuffed Zucchini with Barley, Sausage & Tomatoes
1 sausage (we used andouille)
2 medium tomatoes, chopped
2 tbsp olive oil or butter
1 small onion, chopped
1-2 cloves garlic, diced
1 tsp ground cumin
6 tsps worcestershire sauce
1 cup shredded cheese (cheddar is tasty!)
Salt & pepper to taste
1. Put 3 cups of broth (or 3 cups water with a veggie bouillon cube) over high heat to get to a boil. Once boiling, add 1 cup pearled barley and reduce heat to simmer. Set a timer for 20 minutes.
2. Hollow out your zucchinis by slicing the stem end off and using your knife to cut a circular slit about 1/4" in from the outer edge. This slit makes it easier to get a spoon in to scoop out the inside. Try to maintain about 1/4" from the outside so the zucchini flesh will cook evenly. Chop flesh and place to side.
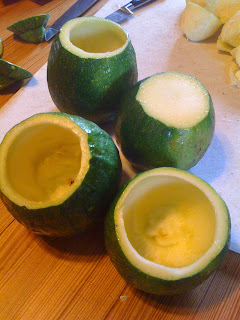 3. Heat 1 tbsp olive oil in a pan over medium heat. Add sausage and crumble it as small as you can as it browns. Once brown, set aside sausage but reserve grease.
4. Preheat oven to 400 degrees.
5. Add butter or olive oil to pan with sausage grease. Saute onions over medium heat and cook until translucent. Add a cup of the chopped zucchini and the garlic and saute a minute or so more.
 6. Mix pearled barley, sausage, cooked onions, garlic & zucchini, chopped tomatoes, cumin, salt & pepper in bowl. Place mixture inside hollowed out zucchinis using a spoon. If you end up with extra, put in a container and use as a side dish for another meal or as goodies to mix in with an egg scramble.
7. Place prepared zucchinis in a glass baking dish or cast iron skillet and put in oven. Set time for 20 minutes.
 8. Pull zucchinis out and add a tsp of worcestershire sauce to each one. Then top with shredded cheese. Put back in oven until cheese has browned, about 10 minutes.
9. Serve and enjoy! These keep very well in the fridge for leftovers.

Stuffed Zucchini with Barley, Sausage & Tomatoes
1 cup pearled barley, uncooked
3 cups chicken or veggie broth (we use veggie bouillon cubes)
6 round zucchini, softball sized, hollowed out1 sausage (we used andouille)
2 medium tomatoes, chopped
2 tbsp olive oil or butter
1 small onion, chopped
1-2 cloves garlic, diced
1 tsp ground cumin
6 tsps worcestershire sauce
1 cup shredded cheese (cheddar is tasty!)
Salt & pepper to taste
1. Put 3 cups of broth (or 3 cups water with a veggie bouillon cube) over high heat to get to a boil. Once boiling, add 1 cup pearled barley and reduce heat to simmer. Set a timer for 20 minutes.
2. Hollow out your zucchinis by slicing the stem end off and using your knife to cut a circular slit about 1/4" in from the outer edge. This slit makes it easier to get a spoon in to scoop out the inside. Try to maintain about 1/4" from the outside so the zucchini flesh will cook evenly. Chop flesh and place to side.

4. Preheat oven to 400 degrees.
5. Add butter or olive oil to pan with sausage grease. Saute onions over medium heat and cook until translucent. Add a cup of the chopped zucchini and the garlic and saute a minute or so more.

7. Place prepared zucchinis in a glass baking dish or cast iron skillet and put in oven. Set time for 20 minutes.

9. Serve and enjoy! These keep very well in the fridge for leftovers.
Subscribe to:
Posts (Atom)